How To Get Rid of Shortcut Viruses On A Computer and Removable Drives
First
and foremost,it's advisable you update your Anti-virus to see how it
all goes and if this doesn't solve the issue,you can proceed to the
methods below.
Apart from updating your Antivirus,there are some softwares capable of getting rid of this virus. The best of them are listed below
So,download any of those and follow the instructions on the sites to use them.
Manual fixes are also available to solve this problem.Therefore,you can make use of any method you consider easier.
a.)Insert
whichever drive is infected by this virus into your system and check
the drive's extension i.e A: .... Z: from ‘My Computer’ Click Start » Run / Winkey+R and type cmd in the textbox provided - Hit Enter. c.)Copy paste the code below into the command prompt and hit 'Enter'. attrib -h -r -s /s /d E:\*.* (Change E: to your drive's extension.) d.)Now,check to confirm that the virus has been completely cleared-off.
Else,you can use this alternative. a.)Go to the control panel to untick “Hide protected operating system files” or simply use the search box.
b.)Navigate to “C:\Windows\System32” and manually delete regsvr c.)If you can't find the file in System32, then try locating it in “C:\program files” If you still cannot find it there,then try locating it in the “Processes” tab in Task Manager.
Now,with
all the software & manual fixes highlighted above,one is bound to
work for the drive. - See more at:
http://freebie-planet.blogspot.com/2013/01/how-to-remove-shortcut-virus-from.html#sthash.OsWLVAc3.dpuf
Every
operating system needs an occasional repair job, and Windows 7 is no
exception. Whether the source of the problem is corrupt data, a
particularly brutal piece of malware, or some other serious issue,
you'll occasionally have to reinstall your copy of Windows.
Wiping your hard drive and performing a fresh installation can be a huge
headache; but fortunately there's a way to repair a corrupt Windows 7
installation while keeping all your programs, personal data, and user
accounts intact. With Windows 7 you can perform an in-place upgrade
installation to repair a flaky existing install. Though technically
designed to upgrade older Windows operating systems like Vista, the
in-place upgrade installation option can also be used to repair an
existing installation of Windows 7.
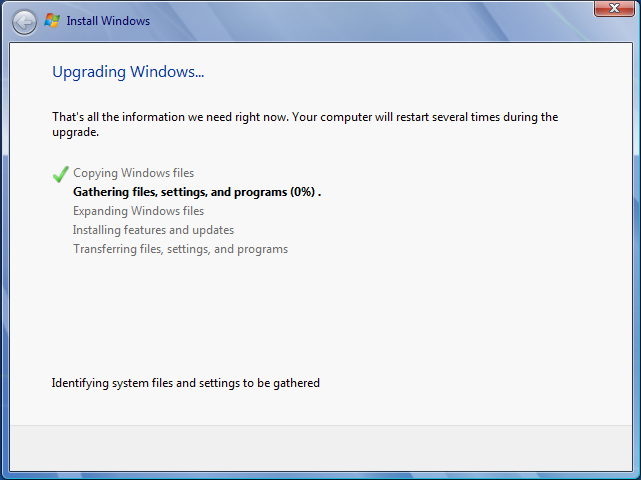
The
in-place Upgrade installation involves multiple stages, starting with
copying installation files to the destination drive and gathering
existing files and settings.
Note that you must perform the in-place upgrade process from within
Windows; if your PC can't fully boot to the Windows desktop, this repair
guide is not for you. A few other limitations come up later in the
article, so be sure to read the entire guide thoroughly before
attempting to repair your corrupt copy of Windows 7. Performing a repair
installation should be your last resort, and you should consider it
only if you have already removed spyware from your PC, reinstalled your drivers, and unsuccessfully tried to restore from an earlier (working) version of Windows 7 using System Restore.
Prepare Your PC for Windows 7
Before performing a repair installation, you should take a few
precautionary measures to ensure that the process goes smoothly. The
first step is to back up all of your critical files to an external
storage device. Though the repair process is unlikely to fail or to
render any of your files unrecoverable, it's always a smart idea to back up your data.
After you've backed up your system's important data, we recommend
uninstalling any third-party security software such as firewalls or
antivirus applications. You can always reinstall them after completing
the repair process; but since you'll be initiating this process from
within Windows, you need to remove any security applications that
actively scan files. You should also download and store all of the
drivers that your system needs to function--especially the network
controller, which tells your network adapter how to access the Internet.
After backing up all of your drivers, clean out all of the temporary
files and junk data that have accumulated in Windows 7 over the course
of prolonged use. To do this, click the Start button, and in the Search field type Folder Options; then press Enter. In the Folder Options window, click the View tab and select Show hidden files, folders and drives; then click OK.
Next, initiate a Disk Cleanup by opening the Start menu and selecting Computer; right-click your primary drive (the C: drive by default) and open the Properties menu. Select the Disk Cleanup utility in the lower-right portion of the menu, and select Clean up system files. The Disk Cleanup utility should take a few moments to rescan the drive. Next, click the More Options tab, and select Clean Up in the 'System Restore and Shadow Copies' section at the bottom of the menu. In the dialog box that appears, click the Delete button; then navigate back to the Disk Cleanup tab, confirm that all items in the Files to Delete list are checked, and click OK.
The Disk Cleanup utility should clear out outdated system files,
temporary data, and other digital detritus. Depending on how much junk
data is on your drive, this step may take anywhere from a few seconds to
a few minutes.
After running the Disk Cleanup utility, you should clean out a few
folders manually. Open the C: drive again, and double-click the Windows
folder. Scroll down the list of folders and delete any files in the
Prefetch and Temp folders. Be sure to delete only files within those two
folders and not the folders themselves. Next, navigate back to the C:
drive, and double-click the Users folder. Within the Users folder, double-click first the folder for your particular username, and then the AppData folder (if you don't see the AppData folder, you must not have selected 'Show hidden files, folders and drives' earlier), the Local folder, and finally the Temp folder. Delete all of the files in this Temp folder as well; then restart your system.
Shobat adalah pengguna windows vista atau windows7 ? Pada awal
penggunaan semuanya berjalan normal, namun lambat laun semakin lama bisa
saja terjadi error atau kesalahan pada beberapa fitur windows 7.
Beberapa fitur yang ada menjadi tidak bisa diakses seperti folder option
menjadi hilang, icon recycle bin tidak ada, cd/dvd drive tidak muncul,
Icon Internet explorer tidak muncul, dan fitur-fitur yang lain.
Kesalahan atau error ini dapat disebabkan oleh aktivitas virus computer,
malware, atau bisa juga karena perubahan yang diatur oleh user sendiri.
Dalam keadaan yang seperti ini (beberapa fitur menjadi disable), tentu
shobat menginginkan agar windows 7 anda berjalan normal kembali seperti
sedia kala. Dengan demikian semua aktivitas yang berhubungan dengan
computer dapat berjalan dengan lancar. Untuk mengatasi error yang
seperti itu, shobat bisa memperbaikinya sendiri walaupun shobat masih
awam. Dengan bantuan software FixWin buatan
http://www.thewindowsclub.com/ ini shobat dapat memperbaiki kesalahan
atau error yang terjadi pada windows 7 dengan sangat mudah. Yang perlu
shobat lakukan adalah dengan memilih pilihan error kemudian klik Fix,
maka software FixWin ini akan bekerja untuk shobat memperbaiki windows 7
yang mengalami error.
Software FixWin ini merupakan freeware dan berupa software portable yang
hanya bekerja pada windows vista atau windows 7. Sedangkan pada windows
xp tidak dapat berjalan. Untuk mendapatkannya shobat dapat mengunjungi
halaman dari thewindowsclub.com atau langsung download pada link dibawah. Fitur repair pada software FixWin diantaranya adalah :
Terdapat 7 fitur utama, yaitu Welcome, Windows explorer, Internet and
Connectivity, Windows Media, System Tools, Additional Fixes, dan About.
Pada menu Welcome shobat disarankan untuk melakukan System File Checker
Utility dan membuat system restore point. Pada menu Windows explorer
beberapa diantaranya adalah Fix Recicle bin icon is missing from
desktop, Reset atau fix Folder view settings to default, Enable to game
explorer folder, enable folder options, fix show hidden files, folders
and drives, dll. Pada menu Internet and connectivity diantaranya adalah
fix internet option is missing, optimize internet explorer maximum
connection, Fix run time error dialogs are appearing in internet
explorer when surfing. Pada menu windows media fiturnya adalah Windows
media player doesn’t start and an error message appears “ An internal
application error has occurred”Reset windows Media library and fix
library sync issues. Pada menu system tools beberapa fitur repair yang
disediakan adalah Enable Task manager, enable command prompt, enable
registry editor, enable MMC snap-ins, Reset system restore to default,
Repair windows defender. Pada menu additional fixes beberapa fitur yang
ada diantaranya Enable hibernate, fix corrupted desktop icon, Aero snap
is not working dan lain sebagainya.
Dengan bantuan software FixWin ini user akan mendapatkan kemudahan untuk
memperbaiki windows vista atau windows 7 ketika terjadi error.
Windows XP Service Pack 3 (SP3) mencakup semua update yang dirilis pada
sistem operasi sebelumnya. Pembaruan ini juga mencakup sejumlah kecil
fungsionalitas baru, yang tidak signifikan mengubah pengalaman pelanggan
dengan sistem operasi. Paket khusus ini juga mengandung simbol
debugging khusus untuk binari serta mencakup sejumlah kecil
fungsionalitas baru.
Mengapa Windows XP Service Pack 3 - ISO-9660?
Mungkin sebagian dari kita atau rekan kita masih menggunakan sebuat
perangkat komputer dengan komposisi rendah, kecepatan terbatas, memory
minim, maka alangkah baiknya tetap menggunakan sistem operasi ini.
Memaksakan sebuah perangkat komputer rendah dengan sistem operasi
terbaru adalah cara tercepat merusak perangkat komputer, loading lambat,
hardware cepat panas, dll dech.
Silahkan download dari sumbernya langsung, file format iso: Download
Buat anda yang mengalami laptop atau komputer yang lelet ketika
menjalan komputer anda dengan sistem operasi windows baik itu saat anda
melukan booting atau saat anda melakukan shutdown.
Diawali dengan pengalaman pribadi saya terinspirasi untuk membagikan
tips komputer ini kepada anda.Karena sesungguhnya tidaklah sulit untuk
mengatasi mengalami komputer dan sistem operasi yang lelet.
Sedikit perhatian artikel komputer ini tidaklah sepenuhnya hasil tulisan
tangan saya atau hasil ketikkan saya karena beberapa kata-kata sudah
tersimpan dalam komputer saya denga format pdf.Jadi yang merasa artikel
ini asli karya tulis anda saya harap maklum.
Dan berikut 32 cara mempercepat windows xp/7/8 melalui registry:
• Klik tombol Start > Run. Ketik regedit dan tekan Enter setelah berada didalam jendela Run.
• Didalam Registry Editor, pilih menu File > Export.
• Setelah Export Registry File muncul, masukkan nama file ke bagian File
Name, misalnya backup-registry dan sebagainya. tekan tombol Save.
1. Mempercepat akses Folder - dengan mendisable Last Access Update.
Jika anda memiliki banyak folder dan subdirectories, maka akses ke
Direktory2 Windows XP terasa sangat berat dan seringkali cuman membuang
waktu. Dengan mengupdate time stamp di registry, yaitu last access
update untuk semua sub directory.
• Start>Run>regedit
• “HKEY_LOCAL_MACHINESystemCurrentControlSetContr olFileSystem”Klik
• kanan di bagian yg kan (cari area yg kosong), lalu pilih ‘DWORD Value’Bikin
• DWORD Value dengan nama ‘NtfsDisableLastAccessUpdate’Klik kanan pada value baru terus pilih ‘Modify’Ubah data menjadi ‘1′
• Klik ‘OK’ 2. Mempercepat waktu Boot
Fitur yg lumayan asik dari Windows XP adalah kemampuan untuk mendefrag
ketika ada dalam proses booting. Boot Defrag pada prinsip menata file2
yg relevan dengan booting secara berurutan. Secara default fitur ini
telah diaktifkan pada beberapa Build Windows, tapi beberapa build
windows tidak, ada baiknya kalo kita cross check terhadap fiotur yg satu
ini.
• Start Menu>Run
• Regedit
• HKEY_LOCAL_MACHINESOFTWARE/Microsoft/DfrgBootOpt imizeFunction
• Cari “Enable” dibagian kanan regedit
• Klik “Modify”
• Pilih “Y to enable”
• Reboot 3. Mempercepat Performa Swapfile
Jika anda memiliki ram lebih besar dari 256MB bisa dibilang tweaking yg
ini akan membuat sistem anda berjalan lebih cepat. Tweaking ini pada
dasarnya PC kita mengunakan setiap byte dari memori fisik yg terpasang
di komputer kita, SEBELUM mengunakan swap file.
• Start>Run
• “msconfig.exe”>ok
• Klik tab System.ini
• Klik tanda plus pada tab 386enh
• Klik kotak new kemudian ketik “ConservativeSwapfileUsage=1″
• Klik OK
• Restart 4. Mempercepat Loading Windows Menu
Tweak ini adalah tweaking fav saya, karena akan komputer kita terasa
lebih cepat. Tweaking ini membuang waktu delay ketika kita mengklik menu
dan windows XP menampakkan Menu.
• Start>Run
• Regedit>Ok
• “HKEY_CURRENT_USERControl PanelDesktop”
• Pilih/Sorot “MenuShowDelay”
• Klik kanan dan pilih “Modify’
• Ketik angka “100″ (aslinya 400) Angka 50-150 adalah kisaran yg baik, bisa disesuaikan dengan Mood anda 5. Mempercepat Loading Program.
Tweaking ini bisa berjalan untuk sebagian besar program. Jika program
tidak mau loading seperti yg diharapkan, silahkan aja dikembalikan ke
setting semula.
• Klik kanan pada icon/shortcut yg berkaitan dengan program.
• properties
• Pada kotak ‘target’, tambahkan ‘ /prefetch:1′ diakhir kalimat.
• Klik “Ok” 6. Mempercepat Shutdown Windows XP.
Tweaking ini mengurangi waktu tunggu secara otomatis ketika windows sudah menerima instruksi untuk shutdown.
• Start>Run
• ‘Regedit’>OK
• ‘HKEY_CURRENT_USERControl PanelDesktop’
• Sorot ‘WaitToKillAppTimeout’
• Klik kanan dan pilih modify
• Ubah value menjadi ‘1000′ (aslinya 20000)
• Klik ‘OK’
• Sorot ‘HungAppTimeout’
• Klik kanan dan pilih modify
• Ubah value menjadi ‘1000′
• Klik ‘OK’
• ‘HKEY_USERS.DEFAULTControl PanelDesktop’ sorot WaitToKillAppTimeout’
• Klik kanan dan pilih modify
• Ubah value ke ‘1000′ (aslinya 20000)
• Klik ‘OK’
• ‘HKEY_LOCAL_MACHINE/System/CurrentControlSet/Control sorot “WaitToKillAppTimeOut”.
• Klik kanan dan pilih modify
• Ubah value menjadi ‘1000′ 7. Restart dgn Cepat !!
• Pada key :
HKEY_LOCAL_MACHINE | Software | Microsoft | Windoes NT | Current Version
| Winlogon Tambahkan string value EnableQuickReboot dan isi defautnya
dengan 1 8. Login Otomatis
• HKEY_LOCAL_MACHINE/SOFTWARE/Microsoft/Windows NT/CurrentVersion/Winlogon
• Klik ganda AltDefaultUserName dan masukkan username account yang dipilih.
• Klik ganda AutoAdminLogon dan masukkan angka 1 pada Value Data.
• Buat sebuah DWORD Value baru dan beri nama DefaultPassword.
• Klik ganda DefaultPassword dan masukkan password account yang dipilih pada Value Data. 9. Mencegah Perubahan Menu Start
• HKEY_CURRENT_USER/Software/Microsoft/Windows/CurrentVersion/Policies/Explorer
• Buat sebuah DWORD Value baru dan beri nama NoChangeStartMenu.
• Klik ganda NoChangeStartMenu dan masukkan angka 1 pada Value Data. 10. Membersihkan Semua Ikon Pada Desktop
• HKEY_CURRENT_USER/Software/Microsoft/Windows/CurrentVersion/Policies/Explorer
Buat sebuah DWORD Value baru dan beri nama NoDesktop.
Klik ganda pada NoDesktop dan masukkan angka 1 pada Value Data. 11. Membuat Desktop Lebih Stabil
• HKEY_CURRENT_USER/Software/Microsoft/Windows/CurrentVersion/Explorer
• Buat sebuah DWORD Value baru dan beri nama DesktopProcess.
• Klik ganda DesktopProcess dan masukkan angka 1 pada Value Data. 12. Membersihkan Recent Documents
• HKEY_CURRENT_USER/Software/Microsoft/Windows/CurrentVersion/Policies/Explorer
• Buat sebuah DWORD Value baru dan beri nama NoRecentDocsHistory.
• Klik ganda pada NoRecentDocsHistory dan masukkan angka 1 pada bagian Value Data. 13. Menyembunyikan System Tray
• HKEY_LOCAL_MACHINESoftwareMicrosoftWindowsCurr entVersionPoliciesExplorer
• Jika key Explorer belum ada buatlah sebuah DWORD Value baru dan beri nama NoTrayItemsDisplay.
• Klik ganda NoTrayItemsDisplay dan masukkan angka 1 pada Value Data.
• Untuk mengembalikan System Tray masukkan angka 0 pada Value Data.
• Menonaktifkan Klik-kanan Pada Desktop
HKEY_CURRENT_USER/Software/Microsoft/Windows/CurrentVersion/Policies/Explorer
Buat sebuah DWORD Value baru dan beri nama NoViewContextMenu.
Klik ganda pada NoViewContextMenu dan masukkan angka 1 pada Value Data. 14. Menonaktifkan Menu Properties My Computer
• HKEY_CURRENT_USER/Software/Microsoft/Windows/CurrentVersion/Policies/Explorer
• Buat sebuah DWORD Value baru dan beri nama NoPropertiesMyComputer.
• Klik ganda NoPropertiesMyComputer dan masukkan angka 1 pada Value Data.
• HKEY_LOCAL_MACHINE/Software/Microsoft/Windows/CurrentVersion/Policies/Explorer
• Buat sebuah DWORD Value baru dan beri nama NoPropertiesMyComputer.
• Klik ganda NoPropertiesMyComputer dan masukkan angka 1 pada Value Data.
• Jika key Explorer tidak ada, buat yang baru dengan mengklik menu Edit > New > Key dan beri nama Explorer. 15. DVD Di Windows Media Player
• HKEY_CURRENT_USER/Software/Microsoft/MediaPlayer/Player/Settings
• Pilih menu Edit > New > String Value dan beri nama DVDUI.
• Klik ganda DVDUI dan masukkan teks Yes pada Value Data. 16. Menambah Identitas Windows Media Player
• HKEY_CURRENT_USER/Software/Policies/Microsoft
• HKEY_LOCAL_MACHINE/SOFTWARE/Policies/Microsoft/Windows
• Klik Edit > New > Key dan beri nama WindowsMediaPlayer.
• Klik Edit > New > String Value dan beri nama TitleBar.
• Klik ganda TitleBar dan masukkan teks yang diinginkan pada Value Data. 18. Mengembalikan Akses Ke CD-ROM
• HKEY_LOCAL_MACHINESYSTEMCurrentControlSetContro lClass{4D36E965-E325-11CE-BFC1-08002BE10318}
• Hapus subkey LowerFilters dan UpperFilters dengan menekan tombol Del. 19. Membersihkan Sampah Registry
• HKEY_CLASSES_ROOT/Application
• HKEY_CURRENT_USER/Software
• HKEY_LOCAL_MACHINE/SOFTWARE
• Pilih salah satu subkey yang merupakan nama software yang ingin dihapus, kemudian tekan tombol Del. 20. Membersihkan Sampah Uninstall
• HKEY_LOCAL_MACHINE/SOFTWARE/Microsoft/Windows/CurrentVersion/Uninstall
• Hapus subkey yang memiliki nama yang sama dengan software yang telah
di-uninstall. Menghapus Daftar Program Yang Tidak Diinginkan 21. Dari Add/Remove Programs
• HKEY_LOCAL_MACHINE SOFTWARE Microsoft Windows CurrentVersion Uninstall
• Hapus subkey yang berisikan program yang tidak diinginkan dengan menekan tombol Del. 22. Menjalankan Program Saat StartUp
• HKEY_LOCAL_MACHINE/SOFTWARE/Microsoft/Windows/CurrentVersion/Run
• Pilih menu Edit > New > String Value dengan nama Winamp misalnya.
• Klik ganda pada value tersebut dan masukkan path tempat program tersebut terinstall (C:Program FilesWinampWinamp.exe). 23. Menghapus StartUp Items Di MSCONFIG
• Klik Start > Run > ketik msconfig, kemudian klik pada tab
startup, hilangkan tanda centang pada program yang ingin dihapus dari
daftar startup.
• HKEY_LOCAL_MACHINESOFTWAREMicrosoftWindowsCurr entVersionRun
• HKEY_CURRENT_USERSOFTWAREMicrosoftWindowsCurre ntVersionRun
• Hapus subkey yang berisikan program-program yang tidak diinginkan dengan menekan tombol Del. 24. Mengganti AM Dan PM Menjadi Pagi Dan Sore
• HKEY_CURRENT_USER/Control Panel/International
• Klik ganda s1159 dan ubah teks AM dengan PAGI.
• klik ganda s2359 dan ubah teks PM dengan SORE. 25. Menonaktifkan Fungsi AutoRun
• HKEY_CURRENT_USER/Software/Microsoft/Windows/CurrentVersion/Policies/Explorer
• Klik ganda NoDriveTypeAutoRun dan masukkan angka 95 pada Value Data. 26. Mematikan Secara Otomatis Program Not Responding
• HKEY_USERS/.DEFAULT/Control Panel/Desktop
• Klik ganda AutoEndTasks dan masukkan angka 1 pada Value Data. 27. Tweaking Memory Pada Windows XP
• HKEY_LOCAL_MACHINE/SYSTEM/CurrentControlSet/Control/SessionManager/Memory Management
• Klik ganda pada DisablePagingExecutive dan masukkan angka 1 pada Value Data.
• Apabila diaktifkan,Windows tidak akan melakukan paging file ke dalam
hard disk. Sistem operasi dan program-program menjadi lebih responsif.
Disarankan untuk komputer yang memiliki memori lebih dari 128MB.
Klik ganda pada LargeSystemCache dan masukkan angka 1 pada Value Data.
Jika diaktifkan, sistem akan mengalokasikan seluruh memori (kecuali 4 MB
untuk disk caching) untuk file caching. Komputer akan melakukan caching
kernel XP di dalam memory sehingga Windows XP dapat berjalan lebih
cepat. 28. Unload .dll Untuk Mempercepat Akses Memori
• HKEY_LOCAL_MACHINESOFTWAREMicrosoftWindowsCurr entVersionExplorer
• Pilih menu Edit > New > Key dan beri nama AlwaysUnloadDLL.
• Pada option Default Value masukkan angka 1. 29. Menyembunyikan Device Manager
• HKEY_CURRENT_USER/Software/Microsoft/Windows/CurrentVersion/Policies
• Pilih menu Edit > New > Key dan beri nama System.
• Di subkey System buatlah sebuah DWORD Value baru dan beri nama NoDevMgrPage.
• Klik ganda NoDevMgrPage dan masukkan angka 1 pada Value Data. 30. Mengoptimalkan Hard Disk Disaat Komputer Dalam Keadaan Idle
• HKEY_LOCAL_MACHINESOFTWAREMicrosoftWindowsCurr entVersionOptimalLayout
• Buatlah sebuah DWORD Value Baru dan beri nama EnableAutoLayout.
• Klik ganda EnableAutoLayout dan masukkan angka 1 pada Value Data. 31. Mengosongkan Temporary Internet Files Pada Saat Exit
• HKEY_CURRENT_USERSoftwareMicrosoftWindowsCurre ntVersionInternet SettingsCache
• HKEY_LOCAL_MACHINESOFTWAREMicrosoftWindowsCurr entVersionInternet SettingsCache
• Buat sebuah DWORD Value baru dan beri nama Persistent.
• Klik ganda Persistent dan masukkan angka 0 pada Value Data 32. Mencegah Klik Ganda Secara Tidak Sengaja
• HKEY_CURRENT_USERSoftwareMicrosoftWindowsCurre ntVersionExplorerAdvanced
• Buat sebuah String Value baru jika belum tersedia dan beri nama UseDoubleClickTimer.
• Klik ganda UseDoubleClickTimer dan masukkan angka 1 pada Value Data.