Showing posts with label android Samsung. Show all posts

ROOT FOR GALAXY TAB 4 7" T230 ( How to )


ROOT FOR GALAXY TAB 4 7" T230

THIS IS FOR THE T230/T230NU NOT ANY OTHER T23X MODELS. OTHER 23X USERS USE AT YOUR OWN RISK

VROOT IS DEPERCIATED AND NO LONGER WORKS BUT WHO CARES SUCKED ANYWAYS.


INSTRUCTIONS

Quote:
Originally Posted by inciongnene doesnt matter now. rooted without the vroot help.
i just flashed TWRP recovery thru Odin 3.09 then it detects that im not rooted and it rooted it few clicks

1.) download Odin 3.09 and TWRP(recovery.tar) - all attached
2.) put tablet on Download Mode (Power Button+Volume Down+Home Button)
3.) flash the recovery.tar thru Odin 3.09 use PDA/AP button on Odin
4a.) put tablet on Recovery Mode, this time it would be modified recovery TWRP (Power Button+Volume Up+Home Button)
4b.) Do NOT boot to android
5.) reboot device to TWRP directly from download mode. TWRP will detect that tablet is not rooted and ask if you want to intalls root. Slide to Install
6.) find SuperSU installer, follow instruction to install.
7.) download RootChecker to verify root

DOWNLOADS

LATEST TWRP

ODIN 3.09 


Source 

How to Fix “E:Failed to Mount /EFS” for Galaxy S3 GT-I9300


Sometimes when you are trying to repair the IMEI number of your device, you follow bad instructions or by fault you didn’t follow it well, as result of that your device will not boot, still frozen on Samsung logo loop and If you have tried to boot into recovery mode, it will display

E:failed to mount /efs (Invalid argument) # Manual Mode #
— Appling Multi-CSC…
Applied the CSC-code : Unknow
Succefuly applied multi-CSC.
Wipe data/factory reset, wipe cache partition, install custom ROM and reflash official firmware will not fix it at all. How to fix E:Failed to Mount /EFS :
  • Download and flash official firmware for your phone
  • Flash CWM recovery and root your device using recovery method.
  • Install ADB on your computer.
  • Boot your device into recovery mode
  • Connect your device to PC via USB cable
  • In recovery mode Choose “mount and storage > mount /system”
  • Open ADB command window and type :
    adb shell
    su
    mke2fs /dev/block/mmcblk0p3
    mount -w -t ext4 /dev/block/mmcblk0p3
    reboot
By following the above cmd, it will create a generic EFS files on your device
Now normally your device will reboot and it should pass Samsung logo.
Your device might display a screen with a yellow text (FactoryMode), follow this to fix it.

How to Turn Off Factory Mode yellow text on Samsung Galaxy Tab

How to Turn Off Factory Mode yellow text on Samsung Galaxy Tab

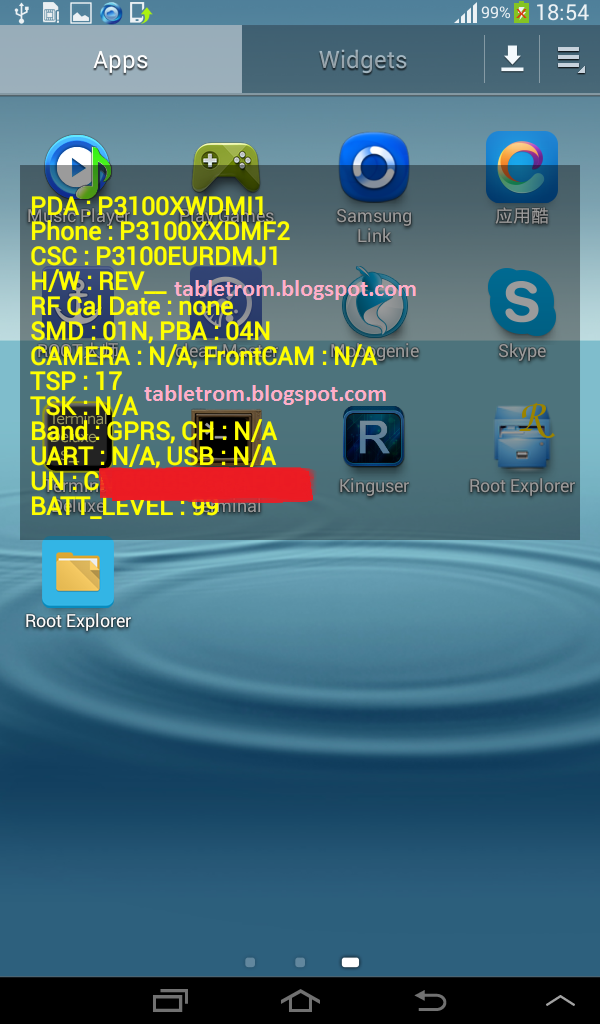
1. Yellow text on LCD Samsung Galaxy Tablets and Smartphones.
2.Directly turn off after pressing power button.
3.Sim data disabled. 
4. Unable to open apps while yellow text displaying on tablet.

Samsung Galaxy Tab samsung smartphones  
 
How to Root Samsung Smartphones and Samsung Galaxy Tablets. 
After successful root SU icon will be displayed on tablet or smartphone. Now you you need to download and install any Terminal Emulator from Google Play Store. Its time play with some commands on Samsung Smart Device.


Samsung Galaxy Tab samsung smartphones
Terminal Emulator 


Open Terminal 

Type  su  (Allow SU to grant access if asked . )
Type rm /efs/factoryApp/keystr (if the message appear "rm failed for  /efs/factoryApp/keystr no such directory") ignore it . 
Type  rm /efs/factoryApp/FactoryMode
Type  echo -n  ON  >>  /efs/FactoryApp/Keystr
Type  echo -n  ON  >>  /efs/FactoryApp/FactoryMode
Type  chown 1000.1000  /efs/FactoryApp/Keystr
Type  chown 1000.1000  /efs/FactoryApp/FactoryMode
Type  chmod 0744 /efs/FactoryApp/Keystr
Type  chmod 0744 /efs/FactoryApp/FactoryMode
reboot

Galaxy tablet or Galaxy Smartphone will be rebooted and you are done. Now the yellow text should not appear because this all happen when efs become corrupted. Now you have successfully repair efs. On / Off mode will be appear again.  This method is personally tested on Samsung Galaxy Tab 2 , success rate was 100% . Work like charm. 
For reference see image below. 


Cara root Galaxy Grand Neo I9060 Kitkat 4.4.2


Cara flash prerooted ROM Galaxy Grand Neo I9060 :

Siapkan bahan-bahan :

1. Samsung USB Driver
2. Odin v3.09
3. ROM GenNxt_GT-I9060_GrandNeo_PreRooted , ektrak menjadi tar.md5. File berukuran sangat besar kurang lebih 800MB.


Langkah langkah :

1. Ekstrak dan instal Samsung USB driver.

2. Aktifkan USB Debugging. Pergi ke Pengaturan > Tentang perangkat > Tekan nomor versi/Build number berkali-kali sampai muncul pemberitahuan "sekarang anda jadi pengembang/ you are now developer", kembali ke pengturan akan muncul menu baru Developer Options, buka dan centang USB Debugging,

3. Masuk mode download, caranya matikan perangkat kemudian tekan dan tahan bersamaan tombol Volume bawah+Home+Power. Lalu akan muncul peringatan segitiga kuning, tekan tombol volume atas untuk melanjutkan.

4. Jalankan Odin.

5. Hubungkan Grand Neo ke PC dengan kabel USB, perangkat masih pada mode download tunggu sampai odin mendeteksi perangkat, kalau kotak ID:COM berubah warna biru maka perangkat berhasil dikenali odin.

6. Masih pada odin tekan tombol AP, lalu arahkan pada berkas ROM tar.md5 diatas.


Pada option pastikan Auto Reboot dan F. Reset Time dicentang dan Re-partition tidak dicentang.
7. Cek kembali kalau sudah yakin klik tombol Start.
8. Setelah proses selesai perangkat akan reboot dan akan muncul PASS di kotak atas odin.
Perangkat bisa dicabut.

9. Cek root pakai root checker instal di playstore.

Keuntungan root menggunakan prerooted ROM adalah ketika sitem rusak atau bootloop tidak perlu mencari dan flash stock ROM , tinggal flash prerooted yang sudah diunduh tadi.

[ Guide ] [GT-I9505] CF-Auto-Root

[ Guide ] [GT-I9505] CF-Auto-Root

Everyone playing with this right now knows the drill, for the rest of you this post will be updated with more information soon. So here's only the short instructions: flash the included .tar.md5 as PDA using Odin, and make sure repartition is not checked. You should see a red Android coming up, and your device will be rooted. If the device boots normally without the red Android, reboot into recovery manually to trigger the process.

This root will trigger the flash counter, which you can reset (currently only the Qualcomm variant) using Triangle Away.
Downloads:

Qualcomm-based GT-I9505: http://download.chainfire.eu/316/CF-...xx-gti9505.zip (Should work on MD2 and newer, but not MDN and MDM firmwares)

NOTE:
Some have reported success on Sprint S4's, though I still advise against using it and waiting for a Sprint specific version.
AT&T S4's are locked, do not use this root unless you have unlocked it
VZW S4's are not seen in the wild yet, but I fully expect those to be locked as well, and incompatible with this root before a bootloader unlock

Source XDA

[GT-I9505] CF-Auto-Root - xda-developers

Flashing Stockrom Samsung Galaxy V sm-g313hz via Odin


Tutorial flashing stockrom galaxy v a.k.a mengembalikan keadaan/system HH menjadi fresh seperti baru. (termasuk menghilangkan root)

Langsung saja :


BAHAN
=====
1.stockrom sm-g313hz  Download

2. odin  Download

3. samsung USB driver ( kalo HH belum ke detec PC ) Download
4. PC / LEPI + kabel DATA
5. kopi dan kacang goreng ^_^ ( biar lebih santai )


TUTORIAL FLASHING STOCKROM VIA ODIN
==================================

  • Extract (unzip) file firmwarel / stockrom
  • Extract Odin
  • Buka Odin v3.09
  • Reboot HH ke Download Mode (Matikan HH lalu Tekan dan tahan tombol Home + Power + Volume Down)
  • Konek HH ke PC tunggu sampai ada tanda biru di odin
  • Add file firmware ke AP / PDA
  • Pastikan re-partition tidak dicentang
  • Click start, tunggu sampai complete
Note :
- Kalau setelah flashing malah bolak-balik di bootanimasi atau bootloop, lakukan full wipe (wipe data/factory reset dan wipe cache) via recovery mode dengan cara menekan tombol Home + Power + Volume Up bersamaan.

Galaxy S4 Sim-Unlocking ( How to )


Follow steps carefully and correctly. Remember, this could damage your device.
Regular disclaimer applies to all.

you have been warned

Instructions:

METHOD 1

1. Dial *#0011#


2. press Menu then tap BACK


3. press the Menu again the tap KEY INPUT then enter 1, press OK button

4. press Menu then tap BACK

Your are now in the SERVICE MODE MAIN MENU


Tap [1]UMTS


then [1]DEBUG SCREEN


then [6]PHONE CONTROL


then [6]NETWORK LOCK


then tap [3]PERSO SHA256 OFF


Go back to the UMTS MAIN MENU by pressing Menu then Back then tap [6]COMMON


then [6]NV REBUILD


then tap [4]RESTORE BACK UP


the device will freeze, black screen, Blue LED Light, Menu and Back key ON. Wait for it to reboot (about a minute).

Your Samsung Galaxy I9505 is now Sim-Unlocked.


----------

METHOD 2 - artnada

This is what I did. Slightly different to OP.

I did this with my AUTHORISED Sim in first.


1. Dial *#0011#
2. press Menu then tap BACK
3. press the Menu again the tap KEY INPUT then enter 1, (wait a few seconds) it auto jumped into service menu.

4. press Menu then tap BACK (not needed for me)

Your are now in the SERVICE MODE MAIN MENU

Tap [1]UMTS (may auto go into next menu (mine did)

then [1]DEBUG SCREEN
then [6]PHONE CONTROL
then [6]NETWORK LOCK
then tap [3]PERSO SHA256 OFF

Go back to the UMTS MAIN MENU by pressing Menu then Back (several times)

then tap [6]COMMON

then [6]NV REBUILD (if this does not work next time)

do [4]RESTORE BACK UP

the device will freeze, black screen, Blue LED Light, Menu and Back key ON. Wait for it to reboot (about a minute).

Your Samsung Galaxy I9505 is now Sim-Unlocked.

Edit:

When I booted back in with AUTHORISED sim, I had to turn off Mobile Data, then turn it on.
I then turned off the phone, put my UNAUTHORSIED Sim in, booted back up and NO NETWORK PIN request!

Again, I had to turn off Mobile data, then turn it back on. The UNAUTHORSIED Sim worked!!! 

My previously locked to Three UK GT-I9505 is now unlocked to all networks  Thanks again to XDA (Y)


----------


It has been reported that this is indeed a "permanent" unlock:

artnada's tests:

I had sim unlocked my phone when I was on the "djemby" pre-rooted I9505XXUAME2-DEODEXED-KNOX-FREE-HD-VOICE

I have just re-flashed my original factory Three ROM. I9505XXUAMDC_I9505H3GAMD6_I9505XXUAMDC_HOME and the Sim unlock was still UNLOCKED!

I then re-flashed back to I9505XXUAME2-DEODEXED-KNOX-FREE-HD-VOICE.tar.md5 and the sim unlock was still UNLOCKED!

So, I think we can safely say this sim unlock method is a permanent unlock!

Mod Edit

In order to get this to work ,you need modem ME2... follow this :


Quote:
Originally Posted by LordLink View Post
Finally I managed to sim unlock my phone after 10 days of experiments


I have a Samsung Galaxy S4 GT-i9505 LTE with Android 4.4.2 bought from France (XEF):
  1. I rooted my phone using CF-Auto-Root
  2. I flashed with Odin the ME2 modem only (XXUAME2 for my case) using the CP/PHONE bouton - find the list in this thread
  3. I used RegionLock Away as described in this post

Thanks to all members of XDA

[GUIDE][GB/JB] All About Galaxy Ace 2 GT-I8160. Flashing, Pre-rooted Firmwares, etc.


How to flash a new firmware to your phone with ODIN


Latest available Gingerbread Europe firmware: I8160XXLL2 (26 December 2012) [Android 2.3.6]

Latest available Jelly Bean Europe firmware: I8160XXMG2 (5 July 2013) [Android 4.1.2]


Instructions (Gingerbread)

  1. If you don't have Samsung Kies installed in your computer, download and install Samsung USB Drivers. Download Odin 3.07 (latest), too.
  2. Go to: http://www.sammobile.com/firmware/, type "I8160" in the search and download the firmware you want. Alternatively you can make/download a pre-rooted firmware from the second post if you want.
  3. Extract the firmware and you will get something like I8160XXLL2_I8160OXXLL2_HOME.tar.md5
  4. Make sure that you have at least 15% battery. Put your phone in Odin Mode. (Turn off your phone, and then press: volume down + home + power button simultaneously for 3-4 seconds)
  5. Open Odin 3.07, connect your phone and you will see an ID:COM box filled with blue at the top-left corner. (1st image)
  6. Tick 'PDA' click it to select the I8160*****_I8160******_HOME.tar.md5 file you extracted in step 3.
  7. Take a deep breath. Press 'Start'. The flashing process will take about 6 minutes.
  8. When you see a green box with 'PASS' at the top-left corner, then you can disconnect the phone's cable. (2nd image)
  9. Enjoy.


Instructions (Jelly Bean)
  1. If you don't have Samsung Kies installed in your computer, download and install Samsung USB Drivers. Download Odin 3.07 (latest), too.
  2. Go here to download XXMB2 JB leak (outdated) or here to download XXMB4 JB leak (outdated). You can find ME7/MF1 on Ace 2 General Forum.
  3. Extract the firmware and you will see a few files. CODE_I8160XXMF1.tar, CSC_OXA_I8160OXAMF1.tar and GT-I8160_EUR_XX_4G.pit will be used in ODIN.
  4. Make sure that you have at least 15% battery. Put your phone in Odin Mode. (Turn off your phone, and then press: volume down + home + power button simultaneously for 3-4 seconds)
  5. Open Odin 3.07, connect your phone and you will see an ID:COM box filled with blue at the top-left corner. (1st image)
  6. (Skip this step if you are already on JB) If you are on a GB firmware, click 'PIT' and select GT-I8160_EUR_XX_4G.pit. Re-partition box should be checked in options. Warning!!! Don't tick repartition if you are already on MB2/MB4/MC8 and you want to go to a newer firmware!
  7. Click 'PDA' and select CODE_I8160XXMF1.tar & 'CSC' and select CSC_OXA_I8160OXAMF1.tar.
  8. Take a deep breath. Press 'Start'. The flashing process will take about 8 minutes.
  9. When you see a green box with 'PASS' at the top-left corner, then you can disconnect the phone's cable. (2nd image)
  10. Enjoy.


Notes:

Odin: Its the latest available version, slightly modified by me, so all other options & file download options except 'PDA' are deactivated for safety.
Firmware: Always update to the latest available so you have the more recent bugfixes, stability fixes and new features.
Upgrading with Odin, won't wipe your data & won't increase the flash counter.
I take no resposibility if your phone explodes or sth


source

How to Update Samsung Galaxy Nexus I9250 to Android 4.4.2 KitKat


Samsung Galaxy Nexus is excluded among Android 4.4 eligible devices due to 18-month window update expiration. Fortunately, developers have made effort to create an Android 4.4.2 firmware designed for Galaxy Nexus I9250.
OmniMetal 4.4.2 ROM
OmniMetal ROM added tons of new features based on the latest Android 4.4.2 KitKat version for Samsung Galaxy Nexus just like other custom ROMs. It includes CPU governor, better multi-tasking management and bloatware free system.
Requirements
1.      Samsung Galaxy Nexus I9250 GT-I8190, it is not confirmed if it works with other Galaxy Nexus variants.
2.      Create a manual backup of all personal information, settings and files on the Galaxy Nexus
3.      Make sure that the battery level is at least 50 per cent to avoid power interruption during the flash.
4.      Root the Galaxy Nexus and install a custom recovery such as ClockworkMod recovery.
5.      Enable USB debugging mode. Go to 'Settings > Applications > Development > USB debugging.'
6.      Download and install the necessary USB drivers for Galaxy Nexus on the computer.
7.      Download the OmniROM 4.4 custom ROM and Google Apps package to your computer.
Warning: OmniROM 4.4 requires manual installation on the Galaxy Nexus. IBTimes and developers of OmniROM are not responsible for any damages which may occur on your handset. Read, understand and follow the instructions to avoid damaging the smartphone. Do this at your own risk.

Flashing Instructions
1.      Connect the Samsung Galaxy Nexus to the computer using a USB cable.
2.      Copy the OmniROM 4.4 custom ROM and Google Apps package to the microSD card of Galaxy Nexus. No need to extract any of the zip files.
3.      Disconnect the Galaxy Nexus then switch it off.
4.      Reboot into boot loader mode by pressing and holding the "volume up + volume down + power" keys at the same time till the Samsung logo appears.
5.      Select the recovery on the boot loader mode menus. Then create a nAndroid backup by selecting "backup and restore > backup." You may restore the saved ROM anytime you want.
6.      Perform a full wipe on your device. Select "wipe data/factory reset" and "wipe cache partition." Then select "advanced > wipe Dalvik cache."
7.      Install the OmniROM 4.4 by selecting "install zip from SD card > choose zip from SD card > look for the firmware > confirm installation." Apply the same with Google Apps zip file.
8.      After the installation, go back to the main menu and select "reboot system now."
9.      Your Galaxy Nexus will restart and may take up to five minutes before reaching the home screen.
Congratulations! Now your Samsung Galaxy Nexus is running the latest Android 4.4.2 KitKat OS, thanks to OmniROM 4.4 custom firmware.

Samsung Pattern Unlock GSMSOLUTION VERSION

Samsung Pattern Unlock GSMSOLUTION VERSION


DOWNLOAD
 Extract Samsolution.exe.zip

-----------------------------------------

1 => Connect Your Device To PC

2 => Open Samsolution.exe

( ! Not require to select Model Listed/ Don't Select Model Listed )

3 => Click to Search Ports Button

4 => Select COM port of your Device from above Drop down List

(if don't know, Find your Device's serial COM port from Device Manager = {Right click My Computer -> Manage -> Device Manager -> Ports (COM & LPT) } ).

5 => Click Read all info from Phone!

6 => Click Disable Pattern UNLOCK!

( Now Just Disabled Pattern Lock ! if you want to backup your Phone Data Doi it Manually)

7 => Click Factory Setting Phone

----------------------------------------------------
Reboot your Device ! Done. Create New Pattern Lock.........

Note! : The Application Name is ' Samsung Tool ' , But You Can try With All Android Devices - Just Select Your Device's COM port
Download Here

Cara Upgrade Samsung Galaxy Note 2 GT-N7100 Android 4.4.2 Kitkat

Ada 3 cara untuk melakukan update firmware pada samsung galaxy note 2 anda, yaitu melalui OTA update, Kies dan update manual melalui Odin. Pada kesempatan kali ini saya akan mencoba menjelaskan satu persatu dari ke-tiga cara tersebut.

Pra-syarat :


  • Pastikan sudah terinstall samsung usb driver pada PC atau laptop anda
  • Aktifkan mode usb debugging ( masuk ke setting - general - about - klik build number sebanyak 7x, lalu kembali ke menu setting - general, maka akan ada pilihan developer option )  
  • Lakukan backup data untuk menghindari kemungkinan hilang nya data ketika proses rooting 
  • Pastikan HP anda factory unlocked ( jaringan tidak terkunci ke suatu provider ) 
  • Usahakan persentase batre setidak nya 80%
  • Tutorial ini hanya berlaku untuk Samsung galaxy note 2 versi internasional ( GT-N7100 ), jangan coba2 terapkan tutorial ini pada variant lain atau akan sangat besar kemungkinan terjadi brick.

Bahan yang harus di download :
  • Odin_v3.09  | Download ( Untuk update melalui metode manual update )
  • Sasmung KIES | Download  ( Untuk update melalui KIES, atau bagi anda yang belum pernah menginstal samsung usb driver sebelumnya )
  • Firmware / stock ROM Kitkat untuk wilayah Indonesia ( XSE ) | Download  ( Untuk update melalui metode manual update )

Perhatian : Silakan ikuti tutorial ini secara seksama, Kami tidak bertanggung jawab jika terjadi kerusakan pada perangkat anda selama atau setelah selesai mengikuti tutorial ini.

Cara Update Galaxy Note 2 GT-N7100 Melalui OTA ( Over The Air ) Update

  • Pertama-tama pastikan anda menggunakan koneksi Internet yang sangat stabil, direkomendasikan menggunakan koneksi Wifi
  • Masuk ke Menu dan pilih menu Setting / Pengaturan
  • Scroll ke bawah dan pilih "about device "
  • Lalu klik "Software Update "
  • Seharusnya ada pilihan update, klik OK untuk me-download dan install ( Perhatian..!! : Download menggunakan koneksi 3G / data jaringan, akan menggunakan quota internet anda, pastikan quota internet mencukupi.
  • Setelah proses download dan install selesai, HP akan restart
"Jika  ada pesan "The latest update have allready been installed " ketika proses cek update OTA, anda bisa cek lagi untuk beberapa hari kedepan atau bisa menggunakan metode manual update


Cara Update Galaxy Note 2 GT-N7100 Melalui Samsung Kies
  • Pertama-tama pastikan anda menggunakan koneksi Internet yang sangat stabil, direkomendasikan menggunakan koneksi Wifi
  • Koneksi kan HP anda ke PC atau Laptop
  • Buka software kies, tunggu sampai hp anda terdetect oleh Kies
  • Anda akan melihat tulisan "New firmware upgrade is available " di home screen Kies
  • Ikuti petunjuk selanjutnya di Kies untuk proses update, setelah pro
    ses update selesai, hp anda akan restart

Seperti pada OTA Update, "Jika  ada pesan "The latest update have allready been installed " ketika proses cek update via Kies, anda bisa cek lagi untuk beberapa hari kedepan atau bisa menggunakan metode manual update


Cara Update Samsung Galaxy Note 2 GT-N7100 ke versi android 4.4.2 Kitakat secara manual / via Odin


  • Extract file Odin dan firmware / stock rom yang telah di download di atas
  • Matikan HP anda, posisikan HP ke download mode dengan cara ( tekan dan tahan tombol volume bawah dan tombol home, kemudian nyalakan HP sampai ada tulisan warning......, kemudian tekan tombol volume atas untuk memasuki download mode )
  • Buka software Odin Odin_v3.09
  • Pastikan pada message box odin ada tulisan "Added!!" , dan pada box ID : COM akan terdetect Com port dengan background warna kuning. Jika tidak ada pesan "Added!! " atau com port masih tidak terbaca, pastikan kabel usb, port usb dan driver telah bekerja dengan baik.
  • Klik pada pilihan AP, kemudian arahkan dan pilih file firmware / stock rom yang sudah di download tadi
  • Pada software Odin, pastikan ceklis untuk pilihan "Auto reboot " dan "F. Reset Time "dan pastikan juga pilihan lain untuk tidak diceklis
  • Klik Tombol "Start " makan proses flashing akan dimulai, tunggu hingga kurang lebih sekitar 5 - 10 menit, samapi ada tulisan "PASS!" dengan background warna hijau.

SELAMAT..!!! Anda telah berhasil mengupdate Samsung galaxy note 2 GT-N7100 anda ke android versi terbaru 4.4.2 Kitkat , silakan cek versi firmware anda dengan masuk ke menu Setting - More - About device.

Untuk anda yang ingin me-Root Galaxy Note 2 yang telah di update ke versi android terbaru 4.4.2 Kitkat, silakan ikuti Tutuorial yang telah saya tulis sebelumnya http://www.androidtrip.com/2014/05/cara-root-samsung-galaxy-note-2-gt.html


Mengatasi Problem Boot Loop pada Galaxy Note 2 GT-N7100

Jika terjadi masalah bootloop / hang / restart setelah melakukan proses update firmware, silakan lakukan hard reset dengan cara berikut ini :
  • Masuk ke recovery mode, dengan cara "tekan & tahan volume atas + tombol home, tunggu sampai ada logo robot android dengan bar loading, kemudian akan muncul menu recovery "
  • Kemudian pilih opsi " Wipe data / factory reset " dan " wipe cache partition "
  • pilih reboot system now
  • dengan melakukan hard reset, akan menghapus semua data di hanphone anda

Sekian dulu tutorial kali ini Sobat Androidtrip.., semoga bermanfaat.., jika ada pertanyaan, jangan sungkan untuk meninggalkan komen..,


Sumber : http://www.androidtrip.com

How to Exit Factory Mode for Samsung Galaxy


If your device display a annoying transparency black background which contains some info about your device (PDA, Phone, CSC, H/W, Camera, …) in yellow text … and lock screen is not working, mean that your device is in factory mode.
“Factory Mode” is enabled if the EFS partition is corrupted because of installing custom ROMs, bad Mods or downgrading your current system version or after you succeeded in fixing the EFS partition.
Requirements :
Steps :
  • Open “ES File Explorer” and press on the top left icon
  • Go to Tools and turn on “Root Explorer”es root file explorer
  • Go to Local > / Device > efs > FactoryApp and open factorymode as text in “ES Note Editor”
  • Change it from OFF to ON and save it
  • Open keystr as text in “ES Note Editor”, change it from OFF to ON and save it
  • Reboot
Or :
  • Install “Terminal Emulator
  • Type : su
  • Type : rm /efs/FactoryApp/keystr
    rm /efs/FactoryApp/factorymode
    echo -n ON >> /efs/FactoryApp/keystr
    echo -n ON >> /efs/FactoryApp/factorymode
    chown 1000.1000 /efs/FactoryApp/keystr
    chown 1000.1000 /efs/FactoryApp/factorymode
    chmod 0744 /efs/FactoryApp/keystr
    chmod 0744 /efs/FactoryApp/factorymode
    reboot
You can also remove the annoying message without root, but it won’t fix it
  • Go to Settings > Application manager > All
  • Search Factory Test and “Clear data”, “Clear cache”

Samsung i9300 Dead boot repair solution & imei null solution only for i9300


Samsung SIII i9300 Dead boot repair solution & imei null solution only for i9300
Download samsung s3 boot card maker Here
samsung s3 boot card maker - Download - 4shared


If you're sure you've noticed the boot, then skip this step.
After done this your mobile must be in download mode or white screen if white screen manually put into download mode.
Now update your mobile with factory firmware with PIT file lik below given n the picr.Factory firmware
AndroidFirmwares.net - Download Firmware

After update complete your mobile may not have imei .imei null or your mobile will not boot bcoz of dead boot repair. your efs must be corrupted

* To Fix this prob first root your mobile Download from here (flash it through odin select as odin)
CF-Root Download

* Now Download this EfS repair file and flash it through odin select as odin your mobile must boot
but the imei become lik this 004999010640000
I9300_Repair_efs.tar.rar
i9300_repair_efs.tar - Download - 4shared - Sanjeev Chauhan

If your imei is null you cant repair using this box so 1st you have to repair the efs using above given file. if your imei become like this only (004999010640000) you can repair using z3x or other samsung tool

Samsung Galaxy S4 (GT-I9505) Test Firmware Collection

Samsung Galaxy S4 (GT-I9505) Test Firmware Collection

Samsung Galaxy S4 (GT-I9505) Test Firmware Collection


All leaked test firmwares are brought to you byMod Edit link removed

Model: GT-I9505
Country: Open Europe
Version: Android 4.4.2
Changelist: 276328
Build date: Thu, 2 Jan 2014 23:30:51 +0000
Product Code: OXA
PDA: I9505XXUFNA1
CSC: I9505OXAFNA1
MODEM: I9505XXUFNA1
Download: Mod Edit on links.

Instructions For Flashing Firmware:
- Extract (unzip) the firmware file
- Download Odin3 v3.09 (From Mod Edit on links. or here)
- Extract Odin .ZIP file
- Open Odin3 v3.09
- Restart phone in download mode (Press and hold Home + Power + Volume down buttons)
- Connect phone and wait until you get a blue sign in Odin
- Add - Add I9505XXUFNA1_I9505OXAFNA1_I9505XXUFNA1_HOME.tar.md 5 to AP
- Make sure re-partition is NOT ticked
- Click start button, sit back and wait a few minutes.
- If you encounter any issues with the firmware (Any FC, Bootloop etc)
- Boot into recovery mode (Home+power+vol up)
- Choose to wipe/factory reset. (THIS WILL ERASE ALL OF YOUR DATA INCLUDING YOUR INTERNAL SD CARD!)
- Then choose reboot and you should be good to go!

Screenshots:


How to root Samsung Galaxy Note 3


Download the latest version of the ODIN flashing software for Samsung handsets and the latest USB drivers if your phone doesn't get recognized by your computer, or visit Daerragh's ODIN thread from the source link below.
Get the appropriate file for your Note 3 model, which can be checked from Settings>About phone>Phone identity>Model number, then follow Chainfire's instructions below closely, or visit the respective thread we've sourced at the end:


Download
SM-N900 (International Exynos): CF-Auto-Root-ha3g-ha3gxx-smn900.zip
- Download and unzip the respective CF-Auto-Root-....zip file for your device
- If you end up with a recovery.img and cache.img file, you've extracted twice. You need to end up with a .tar.md5 file - don't extract that one
- (USB) Disconnect your phone from your computer
- Start Odin3-vX.X.exe
- Click the PDA button, and select CF-Auto-Root-....tar.md5
- Put your phone in download mode (turn off phone, then hold VolDown+Home+Power to boot - if it asks you to press a button to continue, press the listed button, or run adb reboot downloadcommand)
- (USB) Connect the phone to your computer
- Make sure Repartition is NOT checked
- Click the Start button
- Wait for Android to boot 


<ID:0/094> Added!!
<OSM> Enter CS for MD5..
<OSM> Check MD5.. Do not unplug the cable..
<OSM> Please wait..
<OSM> CF-Auto-Root-hlte-hltexx-smn9005.tar.md5 is valid.
<OSM> Checking MD5 finished Sucessfully..
<OSM> Leave CS..
<ID:0/094> Odin v.3 engine (ID:94)..
<ID:0/094> File analysis..
<ID:0/094> SetupConnection..
<ID:0/094> Initialzation..
<ID:0/094> Get PIT for mapping..
<ID:0/094> Firmware update start..
<ID:0/094> recovery.img
<ID:0/094> NAND Write Start!!
<ID:0/094> cache.img.ext4
<ID:0/094> RQT_CLOSE !!
<ID:0/094> RES OK !!
<ID:0/094> Completed..
<OSM> All threads completed. (succeed 1 / failed 0)
<ID:0/094> Removed!!
<ID:0/045> Added!!
<ID:0/045> Removed!!

SAMSUNG I9305 baseband unknown ( imei null null)


Make sure you have Samsung Kies or the Samsung USB Driver installed on your PC.
Download Odin3 3.04.
Download and Extract Param_Bin_I9305 - Download - 4shared to your PC.
With your Phone Switched Off, press and hold: 'VOL DN' + 'HOME' + 'POWER' to enter Download Mode.
Connect your phone to your PC via USB Cable and start Odin.
Check your phone is connected by seeing if a COM Port in a Blue box is present under ID:COM.
Press the 'PDA' Button and select the 'Param_Bin_I9305.tar.md5' file you extracted from the Zip Archive earlier.
Press the 'Start' Button and wait for it to finish flashing. If successful, you will see a Green Box with 'PASS!'.
Wait for your phone to reboot then go to your Dialer and press: *#06#. You should now see your IMEI and your Data Connection will be back.

Android 4.4.2 KitKat N900VVRUCNC4 Official Update For Samsung Galaxy Note 3 Verizon Variant: How To Install It Manually [Tutorial]


Android 4.4.2 KitKat firmware is now available for the Verizon variant of the Samsung Galaxy Note 3. Here's how to install it. XDA Developers
The Verizon variant of Samsung Electronics Co Ltd’s (KRX:005935) Galaxy Note 3 with the model number SM-N900V received the official version of the Android 4.4.2 KitKat firmware on Monday. The update comes with the build number N900VVRUCNC4 and it brings all of the features that are found in KitKat updates for other variants of the device.
The Android 4.4.2 KitKat update includes features such as faster performance and better battery life, white status bar icons, full-screen album art while playing music, a camera shortcut on the lock screen, options to set the default SMS and launcher apps, better RAM management and general stability improvements, according to SamMobile.
Users can install the new firmware using either Samsung Kies or the Verizon Upgrade Assistant, or they can wait for an over-the-air update to get the firmware. However, there is a manual procedure to download and install the firmware package using Odin.
Here are certain aspects that users should note before installing the firmware manually:
- All data stored in the device should be backed up
- The handset must have at least 80 percent battery power
- The USB drivers for the device must be installed on the computer and USB Debugging must be enabled
- After flashing the firmware, any installed custom ROM will be lost
- Custom recovery, such as ClockworkMod Recovery or TWRP, will also be lost
Note: International Business Times cannot be held responsible for anything that goes wrong. Users should proceed at their own risk.
Tutorial
Step 1: Download the firmware package and extract the zip file. You will get the file N900VVRUCNC4_N900VVZWCNC4_N900VVRUCNC4_HOME.tar.md5. [Download Links: 1, 2, 3]
Step 2: Download Odin v3.09, and extract the zip file.
Step 3: Run Odin3 v3.09 as an Administrator.
Step 4: Boot the Galaxy Note 3 into Download Mode by pressing and holding Volume Down, Home and Power buttons. After you get a warning message, press Volume Up key to enter Download Mode.
Step 5: Connect the Galaxy Note 3 to the computer via the USB cable and wait until an Added!! message appears in bottom left box in Odin.
Odin-3 Android 4.4.2 manual installation using Odin.  The Android Soul
Step 6: Click on the AP button in Odin and select the N900VVRUCNC4_N900VVZWCNC4_N900VVRUCNC4_HOME.tar.md5 file which was extracted in Step 1.
Verizon-Galaxy-Note-3-Android-4 Android 4.4.2 manual installation on Verizon Galaxy Note 3 using Odin.  The Android Soul
Step 7: In Odin, ensure that only the Auto Reboot and F. Reset Time options are checked.
Step 8: Click on the Start button in Odin to begin flashing.
Step 9: After the process is complete, you will see “PASS!” message in ID:COM port with green background and the device will restart automatically.
Odin-3 Android 4.4.2 KitKat installation using Odin.  The Android Soul
Step 10: Once you get the Samsung logo on the home screen, you can unplug the device from the computer. The phone will now be running Android 4.4.2 KitKat N900VVRUCNC4

Samsung i9300 Null imei efs here (to repair unknown baseband)


Samsung i9300 Null imei efs here to repair unknown baseband

1000%

EFS_I9300_22-2-46

Selected model: I9300
Selected port: COM30 Z3X BOX Serial Port
Selected port speed: 115200
Searching Samsung modem... detected COM130
Reading phone info...
Software version: I9300XXALE8/I9300OJVALE7//I9300XXALE8
IMEI:
Product code: XXXXXXXXXXXXXX
Done with Samsung Tool v.16.1
---------------------------------------------------------------------

Selected model: I9300
Selected port: COM30 Z3X BOX Serial Port
Selected port speed: 115200
Reading phone info...
Model: GT-I9300
Android version: 4.0.4
Product code: Unknown
Phone version: Unknown
PDA version: I9300XXALE8
CSC version: I9300OJVALE7
IMEI: null
Phone S/N: Unknown
Checking Super user right... true
Writing EFS to phone... OK
Rebooting phone... OK

EFS Writing Done
------------------------------------------------------------------------

Selected model: I9300
Selected port: COM30 Z3X BOX Serial Port
Selected port speed: 115200
Searching Samsung modem... detected COM130
Reading phone info...
Software version: I9300XXALE8/I9300OJVALE7/I9300XXLE8/I9300XXALE8
IMEI: 004999010640000
Product code: GT-I9300RWDATO
Done with Samsung Tool v.16.1
--------------------------------------------------------------------------
Selected model: I9300
Selected port: COM30 Z3X BOX Serial Port
Selected port speed: 115200
Searching ADB device... OK
Reading phone info...
Model: GT-I9300
Android version: 4.0.4
Product code: GT-I9300RWDATO
Phone version: I9300XXLE8
PDA version: I9300XXALE8
CSC version: I9300OJVALE7
IMEI: 004999010640000
Phone S/N: R31C50YMSYB
Checking Super user right... true
Reading data from phone... OK
Repairing network settings... OK
Writing data to phone... OK
Rebooting phone... OK
Now connect phone to UART cable
Checking phone at COM30 OK
Reading phone info...
Model: GT-I9300
Country code: ATO
Factory SW: I9300XXALE8
Unique number: CVTF15B5F4F714F
Memory phone: VTU00M
Bypass MSL... OK
Repairing IMEI... OK
Repair done
Rebooting... OK
-------------------------------------------------------------------------

Total Pageviews